Sunday, December 23, 2012

Since

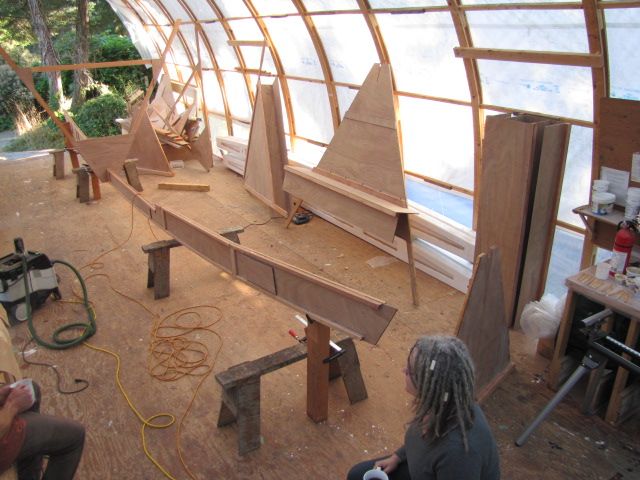
It's winter, and some days really too cold to work on the boat. Trevor's been making heroic progress in hand-freezing bursts, though, and we are close to the point of mocking up the galley. The galley side will be a bit more complicated than the chart table, or so we think.


The galley, though, will not be complicated. We're not planning for refrigeration. We don't want through-hull fittings, so the sink will be a counter-mounted bucket. Our firm sailing plans focus on the Strait of Georgia, so we're not equipping the boat as if we're heading offshore on launch day. 


So far progress consists lots and lots of fillet joints, and a tremendous amount of sanding. And a beautiful companionway.


Looking towards the bow on the day of the turn. Photo by Virginia Hayes

The interior on turn day. Trevor had done some interior sanding while it was still upside down.
Photo by Virginia Hayes.
In this photo, you can see the two benches installed on either side of the galley. You can also see, at the centre of the picture, the lifting sole panels that cover the bilge. Trevor redesigned these panels -- playing naval architect, he calls it! The original design calls for the panels to overlap the ledges at the edges, and that's how we did it on the first hull. You can see that in the picture below.

We didn't like the results in the original. The sole seemed unpleasantly springy underfoot -- there was a lot of flex.

So this time, Trevor built some support pieces in underneath and used these narrower panels. It's altogether more satisfactory, and gives us the thickness of the plywood more headroom. This is minor for most and really irrelevant for us, but we're hoping the tall brother-in-law's neck will now be able to stand upright.


First sole. In this picture, you can't see the ledges visible in the picture above, since the sole overlaps them.
There's a bit of a difference in the companionway, too. On the first hull, we fitted packing pieces between the stringers, leaving no gaps behind the plywood stiffeners at either side of the companionway. It looks great. And it took quite a bit of time. So for this hull, we're following the plans as written and not putting packing pieces in these spots. Of course there are still packing pieces at the bulkheads. For the galley, though, it's easy to imagine uses for the gaps -- we're thinking about hanging vegetables in net bags and such. Mostly, it's easy to find other things to do with the time saved on packing pieces! And the interior of the second hull is going to look great without them.

Here are a couple of final pictures -- the first hull's companionway, with packing pieces, and the second hull's companionway, without.

The companionway is on the right in this picture. It's hard to see the packing pieces -- but you can see the lack of gap between the stringers and the companionway. 
Here's the companionway on the second hull. Here you can see the shadows below the vertical piece -- these are the gaps that on hull #1 were filled with packing pieces.

With the new year and the return of the light, we're anticipating more hours spent building. Stay tuned -- galley mockup is coming soon.

Thursday, December 20, 2012

Jinny's wonderful photos

A blur of motion as the boat rises and the photographer runs... photo by Virginia Hayes
And it's up!              photo by Virginia Hayes
Hands take their turn in the spotlight       photo by Virginia Hayes
Our friend Jinny took these wonderful photos of the turn. These three are favourites.

Sunday, November 4, 2012

Up and over!

Thank you all! What a wonderful afternoon! 

Cradles ready for installation. 

Robbie's mum in position to supervise
The crew assembles. 

Wonderful friends and neighbours...

... from the Commons, Save Our Shores, Positive Energy Quilters, the Gabriola Recorder Consort, St. Martin's ...
... fellow boatbuilders, gardeners and family...

... together can do amazing things!

Almost there! This is the scary part for spectators.


Whew!


And she's upright. She rested on cribs first, and then the cradles were installed. The photographer was busy distributing turnovers so missed these details!

The six survivors of 161 apple turnovers baked this morning in advance of the turn.

Thank you, everyone! It takes a village to turn a hull, and we are very lucky in our village.


Sunday, October 28, 2012

It's that time again!


Here's the invitation you may have already received if you live on Gabriola! Haven't received an invitation? Turn up (and turn over) anyway!

There has been a flurry of mixing epoxy, applying fibreglass, spreading epoxy, rolling epoxy and all manner of other things to do with epoxy since our last entry. It's taken a fair few tanks of propane from the Co-op to keep the shop warm enough to cure everything, but now we're almost there. The final coat went on yesterday. This week Trevor and Robbie will build cradles, detach the hull from the floor, sand the edges so that no one's hands will get hurt, and do the various other things that need to be done before the hull can be turned. Mary will be making turnovers, with help from cousin Pam! (120 last time, and eaten to the last crumb.)

Sunday, October 7, 2012

Roll, roll, roll your boat...

... well, roll-coat, really. When glass cloth is first applied, the weave is very obvious. Although this would give a snazzy tweed texture to the finished hull, it is not desirable. So -- roll-coating.

Yesterday we mixed up batches of epoxy and applied it all over the hull with a roller. We'll do this likely three more times, until the weave of the cloth is no longer visible.

We intended to do another coat today, but yesterday's coat was still tacky late this morning. It's green-cured now, but too late in the day to begin. So -- tomorrow it is! We want to apply each of the layers before the preceding one really hardens, since if we do we needn't sand everything.


Glassing hull #2 -- thanks, yogurt eaters!

No final count yet, but last time I checked we were up to 40 yogurt pots. Perfect for mixing!

Here's the starboard side, with the glass taped into position. Tape comes off once there's enough epoxy to hold the glass in position.
And they're off! Let the spreading commence.
... and continue. It took us one day to install the glass on the two sides. Mixing epoxy takes about as much time as spreading it. Note the sunny day outside -- yay weather!

This is Day 2. The keel gets five layers of glass. On Day 2, we applied two of them.


Thursday, September 27, 2012

Fwd!

The camera seems to have added a time-travel function, unless it really is still 2010. Great! We'll easily make our launch target with this feature!

Forward! means removing the screws (done now), heating and removing the screws that didn't want to let go (done now), filling screw holes (half done), shaping the skeg, shaping the keel, adding the stern rudder post, shaping everything else that doesn't look like the boat...

Much to be done. We're hoping to begin glassing next week, and Robbie and Trevor have both been very occupied in making it so.


Thursday, September 20, 2012

55 person-hours... 48 yogurt pots... 14 disposable brushes... several old t-shirts... 20 pieces of plywood...

 ... and the second hull is planked! 

First came the fairing of the stringers, and dry-fitting of the planks...

... then the sweeping up ...

... that was Monday. We had expected it to be two days, so there was definite jubilation.

Then came the labelling, all in appropriate nautical terminology of course.


Then came Tuesday. Cousin John Hodgkins came to assist... little did he know that he would spend nine hours wiping up epoxy inside the hull -- oh, and scraping it too, sometimes. He has definitely earned the little umbrella in the drink on deck once we're launched.


Robbie and Trevor applying glue for the first piece. Note relaxed cousin and stylish gloves. This was I think the last time I actually saw him until lunch when he emerged from beneath the hull having rather spoiled the gloves' pristine appearance.
The procedure -- both piece and frame wetted out with epoxy, then a thick buttering of epoxy with wood fibre on the frame. Frame held in place with a couple of screws, then nailed on with bronze ringnails. Trevor hammering from outside... Robbie holding a metal bar against the hammering spot inside, and watching to be sure glue squeezed out all the edges. Inside crew had hearing protection. 
Nine hours later, the last piece goes on and Side One is complete.

Procedures changed a bit for Wednesday. John was working on a project of his own, so the three of us took on the second side. In some places on the first side, Trevor used 1" steel screws rather than nails. Screws are removed once the glue has set somewhat. Nails are not. Both the screws and the nails have the same function, though -- they are not structural, they are just used to pull the plywood in to the stringers. Neither Trevor nor Robbie were entirely happy with the nails we had (for supplier reasons, they weren't the length we had for the first hull). So for side two, we decided to use only screws. This turned out to be quite a bit quicker than the nailing procedure. Robbie was able to take up John's fallen wiping rag while Trevor put the screws in from the outside. 


I continued mixing. This may be becoming a habit. But dreadlocks and epoxy really should not mix.

We finished the second side more quickly than the first -- the screws were definitely quicker, and pulled the plywood in more completely. The second day was a lot calmer than the first, too -- minimal hammering.


Trevor's family came to cheer down the home stretch -- here's Naomi supervising.
And after appropriate cheers, rum, wine and congratulations all round, a bit of cleanup to be done.


Today? On with the keel (two more planks added), and underway with the stem, shown below bristling with clamps at the end of the day.


Still lots to be done, but planking in two days seems amazing.


Tuesday, September 11, 2012

That was fun -- let's do it again!


The one moment in the project when I rather wished we were building a monohull.
With the first hull finished, what could we do but begin another one? And quickly, too. Average temperatures are a good bit lower in November than they are in October. We're fairly sure we'll get the temperatures we need to finish glassing the second hull if we can do it before Hallowe'en... but after that would need either good luck or a lot of propane to heat the shop.

We may all be zombies by Hallowe'en, but it does look like we're on track. Here's the progress so far.

The backbone, beam troughs and bulkheads for the second hull were already built, stored in the boatshop rafters.

Down they came, to be reunited with the smaller bulkheads we'd stored in the workshop.

Trevor sanded everything to get rid of the mold that had grown on the plywood surfaces. Ugh. We're still puzzled about why it grew on the plywood but not on the spruce of the shop. It's gone now, anyway.
Stringers are all assembled, and bevelled, and currently on the wall of the shop. Here they are arrayed on the floor (in the way) before they moved to the wall (also in the way, but differently. And they'll be installed soon.)

No task is more satisfying than checking things off a to-do list.

Coffee -- official beverage of the 2012 boat build.


Beginning the setup

We hoisted the backbone to position it on the larger bulkheads.

Eventually all the bulkheads were in place, and things were braced.
And then it was time to level and straighten and such.
Ready for the next phase. Clever observers will see the first keel piece on the far end.


We have gone beyond this now -- currently two layers of wood are glued on the keel, and one on each of stem and stern, and the whole backbone bristles with clamps. But that's a story for another day.